Z3 FAQ
Z3 FAQ
|
|||||
|
|
||||||||||||||||||||||||||||||||||||||||||||||||||||||||||||||||||||||||||||||||||||||||||||||||||||||||||||||||||||||||||||||||||||||||||||||||||||||||||||||||||||||||||||||||||||||||||||||||||||||||||||
 Section 19: Z3 Roadster
19.0: OverviewThe Z3 first appeared to most of the world in the James Bond movie "GoldenEye". BMW's marketing gurus teamed with Neiman Marcus to sell a special edition BMW Z3 "James Bond" roadster that mimicked the look of the car in the Bond movie. The car was available in Neiman Marcus's 1995 Christmas Book, and the initial quantity of 100 cars was sold in a few hours. Neiman Marcus then negotiated with BMW to sell more of the special edition roadsters. The engine for the first model year of the US Z3 was a bored-out to 1.9 liters version of the common 1.8 liter 4-cylinder from the 318. In other areas of the world, the 1.8 liter engine was standard, with the 1.9 liter version available as an option. Midway through the 1996 production run, the battery of the Z3 was moved to the trunk in preparation for the forthcoming 1997 2.8 liter six cylinder Z3 model. This provided marginally better weight distribution, along with a nicer layout for the tools in the trunk. At the same time as the battery move, the amplifier for the factory radio was moved from its carpeted bubble forward of the trunk lid to a carpeted bubble at the right floor of the trunk. An M version of the Z3 was in production for Europe in 1997, and a U.S. version started production in the spring of 1998. The Euro spec M roadster has the same 321 hp engine from the Euro M3. The U.S. M roadster will have the same 240 hp engine from the U.S. M3. The list price on the U.S. M roadster is $42,200, and there are very few options. There are, however, dealer-installed "accessories" which may be added such as floormats and a cd changer. Official performance figures on the U.S. M roadster quote 5.4 or 5.5 seconds 0-to-60, but these are believed to be conservative estimates with the actual time closer to 5 seconds. 19.1: Body
The 2.8 liter Z3 has a slightly wider rear track than the 1.9/1.8 liter model. This leads to a slightly larger overall width for the 2.8. The wheelbase and overall length are identical to that of the 1.9/1.8 liter model. Interestingly, the 2.8 spec sheet shows a height of 50.9 inches compared to 50.7 inches for the 1.9/1.8 liter model, but perhaps the latter was driven a bit/had some tire wear before the measurement. ;) The M Roadster is has virtually the same dimensions as the 2.8 with the exception of a slighly longer wheelbase and it's been lowered by about an inch. How do I install the front mud flaps?
How do I install the rear mud flaps on a 1.9?
For more detailed instructions, click here. Will the rear mud flaps for the 1.9 fit a 2.8?
The secret was to use only the outermost screw in the innermost hole of the mudflap. Things then line up perfectly and the rest of the instructions can be followed. They look great if you like mudflaps. For more instructions, click here. How should I apply touch up paint to my Z3?
(and another response...) I've used BMW touch up kit on several of my many chips. I've used it with the clear top coat and without. My experience is - don't use the clear top coat! The top coat is very hard and I've had a lot of problems trying to blend the touch up area flat with the rest of the finish. (also...) A product called LANGKA offers a convenient and easy solution to touch-up paint repair. Instead of tediously building up a paint chip microlayer
by microlayer, apply a blob sufficient to completely cover the chip or scratch. How do you remove the "gills" on the Z3?
You'll need a pair of long-nose pliers, a philips head screwdriver, a regular (spade) screwdriver, a flashlight and a hair dryer. Read all directions first before proceeding.
It's really simple, it took me about 5 minutes! 19.2: EngineHow do I change the oil in a 1.9?
Well, I just finished my first oil change on my 1.9L. Total time from unpacking and examining all my new toys and tools to cleaning/washing up was just under an hour. I'm sure it will take much less time the next time around, though. Here's what I did: Brought my oil filter, case of oil, filter wrench, Topsider oil changer, a couple of plastic grocery bags, and lots of paper towels to my car. Keys, too. Started taking off the old filter. This was my first step because I was a bit wary about the unique design of the filter. If I couldn't figure it out at this stage, I was going put everything back the way it was and seek assistance. However, once I removed the filter cap, everything became clear. Removing the filter cap was a hassle, tho. I used a strap filter wrench (basically a nylon strap that wraps around the filter). I'm going to return it and get something with the rotation point at the center of the filter cap, then use a 10" extension before attaching my ratchet (there's not much room around the filter, hence the extension). Maybe I'm not explaining it well...a picture might do better (but I don't have one). Anyway, so once I got the filter cap off, I turned a plastic grocery bag inside-out, then put it over the filter cap, and removed it (so as not to drip oil all over the place). I then cleaned off the inside of the filter cap, especially the long bolt that protrudes from the inside of the cap. If you look closely, you will find 3 o-rings on it. There is a large one just above the screw rings near the top of the cap. There are 2 smaller o-rings near the bottom of the bolt. With your new filter, you will find a plastic baggie with 3 o-rings and a metal washer. Get your hands dirty and replace the 3 o-rings. It helps if you have a sharp tool handy to help remove the old ones (the new ones go on fine w/out any tools). If you use the Topsider like I did, you won't need the washer--it's for the drain plug which we don't remove. Then I removed the old oil filter insert, using the same process of wrapping an inside-out plastic bag around it. The new filter pops right in--you might want to use a screw-in motion to seat it well. Then the filter cap with your new o-rings goes back on. Make sure you use exactly 25 N-m of torque like the cap says. ;-) Next I removed the dipstick and primed the Topsider. The suction probe will extend a few inches beyond the length of the dipstick. Make sure you get it in there nice and good. Then let the Topsider do its thing. Next time, this will be the first thing I do, since the Topsider takes quite a bit of time to remove the oil. Oh, and make sure the oil is warm but the engine isn't too hot (might melt the suction probe). When that was done, I started filling the crankcase with the new oil. My manual says 4.7 qts (4.5 L), but my trusty Car and Driver said it had a capacity of 5.3 qts (5.0 L). I checked the dipstick, and 5.0 qts was right at the top of the fill line, so that's where I left it. Then I started her up with the hood up, and inspected my work, hoping that oil wouldn't start spraying from somewhere. Everything checked out fine--mission accomplished! And don't forget to recycle your old oil and filter... Can anyone tell me the routine for changing ones own oil on the 97 2.8 engine. What size wrench for filter, drain plug, etc.
The new OEM filter for the 2.8 should contain 1 washer, 1 O-ring and 1 filter. I believe the 1.9 contains 2 washers, if I'm wrong then somebody will correct me... Has anyone tried the Topside oil changer?
I have the Topside Oil Changer, and it's wonderful! Mine came from a boating outfit called Overton's. It's a bit cheaper there. Just go to the site and do a catalog search for "Topside", no r. It sucked all the oil out of my 1.9 in the time it took me to change the filter element. IMHO, it is the only way to change oil, especially in a car that has a filter that is accessible from the engine room. Plus, when you're done, you remove the vacuum pump and the sucker tube, put on the caps and take the can to the city recycling center. Easy and environmentally friendly! Is there an aftermarket exhaust available for the 2.8?
An answer from someone who did it his way!: What does it do? Well, it is a little loud in the car, but not any louder than one of my neighbors 924's. I had a friend drive the Z while I stood on the sidewalk and it sounds great! Not too loud for neighbors, bystanders. So sounds good, and performance? Whew!! I can bust through the gears at what almost feels like motorcycle speeds. And alluding to my subject, I can chirp the tires WITH ASC ON in 1st, 2nd and 3rd. Now I do have the K&N replacement filter for the standard box, but that is it. A tribute to lowered backpressure! I've noticed with my 1.9L that if I start the roadster and then turn it off, i.e. moving it to the bottom of the driveway. The next time I try to start it I have alot of trouble. I end up holding the gas pedal to the floor to start.
Is the US //M Z3 a 2.5L or a 3.2L?
Then what accounts for the power differences between the Euro and US versions? 320+ hp vs 240 hp. I thought both M power plants generated roughly 100 hp per liter of displacement.
Why the difference? Back in '93, BMW wasn't even going to import the M3 because the cost to certify the engine and chassis was more than BMW could have made up in sales of the M3 (from what I hear the cost to certify an engine in the US is at least $1,000,000 plus ALL engine and transmissions must be certified, so the M3 has had to be certified 5 times (2dr- 3.0L manual and auto, 3.2L manual, 4dr- 3.2L manual and auto). the BMW CCA complained enough to BMW and so they decided to import the M3. To make it financially possible BMW decided to bore and stroke the 2.8L engine and not include the double VANOS system (and saving nearly $15K!!!!). Would you pay $50K+ (in 95, $55K+ now) for an M3??? BMW didn't think so. Differences? (Having never driven a Euro spec M3, these comments are made on the data) not much! Euro engine is 321hp, 258 ft-lbs torque If you remember physics class, hp is responsible for top speed, torque is responsible for acceleration. 0-60 times between the Euro and US spec M3s are nearly identical (thanks somewhat to the gearing of the differential on the US spec car). The cars are neck and neck up to about 90 or 100 when the Euro spec car leaves the US Spec in the dust. I will paraphrase something I heard recently (not sure where) that said both models will snap your neck taking off from a standstill, at 100 the US car still has good acceleration while the Euro spec car will still snap your neck! Will BMW announce a Z3 based on the 2.5L engine in the 323?
19.3: Suspension & SteeringQuotes from the December 2nd AutoWeek regarding their long term Z3:
"By checking ride height, [the dealers] discovered that both rear springs were too short: The left spring was 9mm out of spec, the right one 15mm out. The springs must be within 7mm of the designated length to be acceptable. A [BMW] spokesman said that after installing new rear springs in our car--now, both are within 6mm of designated length--BMW began to inspect other Z3s, and discovered that several cars made early in the production run also had rear springs outside of the bad of tolerance. The spokesman said that dealerships are checking Z3s as the cars' owners bring them in them in for routine maintenance. He also foudn that our tires were overinflated; the tires were reset to the recommended 29 psi" Vibration Aborber: "...[the dealership and BMW] installed a vibration absorber that became standard equipment after our car rolled off the assembly line. The damper is designed to reduce vibration in the drivetrain, and has nothing to do with the suspension system, which seems to work much better now that its rear springs and tire pressures are proper." 19.4: Brakes19.5: HVACMy blue air conditioning button and/or my yellow recirculation button become excessively warm after being engaged for some lenth of time. Is there a fix?
In case of customer complaint, replace the switch with PART NUMBER 61 31 1 380 557 (the "0" in 380 might be a "D")
and, here are an owner's comments on the fix "The dealer replaced both the bulbs in the AC and RECIRC lights. Definitely reduced the brightness at night and buttons are much cooler to the touch. It was all covered by the dealer." 19.6: ElectricalI would like to add the OBC to my roadster, what's the part number?
The airbag warning light turned on without any particular reason.
if that doesn't work...have the dealer replace the seat belt tensioner. and another response: Are all seats prewired for heating?
On some Z3s, the heated seat switches are in an ackward place (in the back between the seats). Can they be moved to the front (next to the a/c switches)?
But for the brave... The following are instructions for moving the rear seat-heater switches to the front console. This is not a job for the faint-hearted or the mechanically-challenged. Please note that this procedure requires you to cut a piece of carpeting located under the console. Not something anyone will ever notice, but it is a permanent change to the car! This procedure assumes you have the seat-heater switches mounted on the back and two blanks on the console to move the switches to. Before you begin: Get a box or container which you can put the screws in. Figure out some way of labeling the screws, they are all different shapes and sizes. Also make sure you have the 5 digit radio code you will need to reactivate the radio. Expect the job to take 2 to 3 hours. READ ALL OF THE FOLLOWING DIRECTIONS FIRST! Tools you'll need:
Trouble! Here's a couple of things I ran into which gave me trouble:
Good luck! And another, but much simpler solution... I moved the heated seat switches today just by simply splicing a 3 foot length of wire to the switches and fishing them forward....total job took 2 hours and i didnt rip out the entire console....just removed the shifter boot....viola! 19.7: PerformanceSeveral owners have installed K & N cone intake air filters. There are mixed opinions about this--some believe that the hot air from the engine is negating any effect the more free air flow is having:
and Let me add (since I know you are also in Texas) that several of us have questioned the performance of the K&N filter. It has a flaw in that it is not vented with fresh (ie cool) outside air. Our theory is that the filter does allow more air in, but it is drawing some of the air off the engine (hot) so the end result might actually be lower air mass. I'm playing around with a heat shield device that would get rid of this problem but all I'm doing is bending and cutting some metal. and here is what someone with a 3-series has to say The guy running the Dyno suggested that the K&N equiped car was suffering from "fan wash" (turbulence from the radiator fan). He also felt that if we shielded the K&N on the engine side of the filter that HP and Torque would increase. We found a piece of cardboard and the Dyno operator's assistant was instucted to hold (by hand) this piece of card board while the test was being performed. WOW!!! WHAT A DIFFERENCE!!! HP went up to 217 and torque was consistently higher then mine was at stock (or without air filter element). What I'm saying here: All of the debate about cool/hot air under the hood is nice...but you guys with the cone type filters really need to forget the snorkel (better yet do the snorkel, it can't hurt), but FIRST AND FOREMOST...PUT a shield between the engine and the filter (aluminum would be good for both air wash and heat)...this will show a consistent and measurable performance gain over just stickin' on a cone filter!!!! Does anyone make a supercharger for the Z3?
19.8: Care, Cleaning, & FeedingI have heard there is some sort of rear window protector (window blanket). What is it?
I'm apprehensive about parking under trees and it's cumbersome having to remove the boot cover every time I want to raise the top. Any tips?
My car came with a cassette holder instead of a cup holder between the seats. How can I get the cup holder?
How should I clean the rear window?
The ONLY stuff to use is Meguiar's #10 (Clear Plastic Polish) and #17 (Clear Plastic Cleaner). (and for the very anal) I clean the rear window when I wash the car. After thoroughly pre-rinsing the car I wash the rear window first, using lot's of clean, sudsy car wash and a soft mitt. I don't "rub" on the window, just kinda float the sopping wet mitt acrossed it. After the car and plastic window get the final flood rinse I dry the window with a clean, very soft towel. Very lightly, straight across, no swirling. When car is dried and waxed then I apply Meguiar's #17 and #10 "Mirror Glaze" Clear Plastic Window Cleaner/Polish as directed (available at your BMW dealer, ~$7 each). When folding the top I place a soft towel over the trailing edge of the rear storage compartment to protect the window from the sharp cornered plastic trim along it's base. Then as I lower the top I place a rolled flannel sheet(1) in the crease formed by the window, pushing it toward the front of the car to force the window to form a smooth curve rather than a hard crease. Just before the top rests in it's stowed position I place small sheets of plastic(2) between the corners of the top and storage cavity to prevent abrasion of the top where the canvas lies over the stretcher bars. Now you know why I only put the top down once a year! (1) Queen size flannel sheet folded to 36" width then rolled like a sausage. (2) Thick, soft plastic sheeting cut into 8" square sheets. I can't find Meguiar's #10 and #17 anywhere. Where can I buy them?
Additionally, Meguair's has a "Clear Plastic Care Collection" containing #10, #17, and #18, plus a cotton terry cloth and applicator pad. It's available for $19.95. You can call Maguiar's by phone at (800) 545 3321. How should I care for my convertible top?
I've owned various roadsters for all of my adult life, some for as long as 25 years. The care the Z3 requires is very similar and basic. This is what I do.... I vacuum the canvas top using a soft brush attachment and only wash it when warranted. I clean the plastic window with a VERY soft mitt and lots of mildly soapy water. To clean and polish the window I use Meguiar's Mirror Glaze #17 and #10, inside and out, following the printed instructions. When folding the top I place a Queen sized, soft, flannel flat bed sheet folded then rolled to form a cylinder about 3" in diameter and perhaps 40" in length. I place this inside the crease that the window forms as it is folding, pushing the roll toward the front of the car to force the window to fold in a gentle arc rather than a hard crease. As the top begins to nest in it's folded position, I place two small (6"x6") sheets of soft plastic between the outer surface of the fabric covering the corners of the stretcher bars and the opposing canvas surfaces these areas rub against. This seems to work well at preventing the canvas from scuffing as it bounces around beneath the boot. I've had the Z3 nealy 9 months and have no creases or blemishes whatsoever in the plastic window or canvas top. Granted, this is a pain in the ass but I tend to leave the top down for extended periods so I don't have to go through this very often and it works quite well. I also use small pieces of very soft foam to fill the gaps in the boot near the door jams. This prevents dust from accumulating on the top while stowed, since dust is the cause of most of the abbrasion that clouds and scratches the window. I hope this helps. Should I use some sort of waterproofing agent on the top?
How should I care for the interior of my Z3?
Does anyone have a quick and easy way to clean the engine and compartment? My BMW tech says to take brake cleaner and just spray all the dirt away. But after reading the can (do not spray on painted surfaces, plastics etc..) I don't think I'll try it. What about using WD40 or Carb cleaner? I am really fearful of having someone wash the engine with water. (Various responses posted to this question on the Z3 Message Board follow)
19.9: MiscWhat are the pinouts for the BMW amp?
Connector J3 from the amp is a mystery. It's got tantalizing labels as SUB HI, GAL OUT; but only GAL IN has a wiring connected to it. Anyone has any info/theory on this? BTW, I've verified that the sub-woofer box behind the seats contains the same HK 5-1/4" speakers as the kick panels. However, I don't believe a straight-forward swap with MBQuarts will work due to limited depth (MBQ's are about 1/4" deeper). It might still be doable with a little creative reworking.
Notes:
I have the HK Stereo, but the speed sensitive volume doesn't work. What can I do?
- Speed sensitive volume control works on non-HK cars BMW Service Bulletin # 65 07 98 gives instructions for fixing the problem. It states the it will be done on a customer complaint basis only.... What will the M roadster cost in the U.S.?
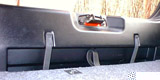
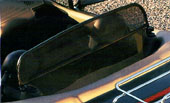
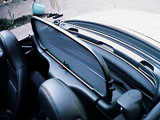
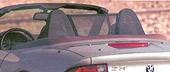
Which wind deflector should I buy?
There are three different wind deflectors. The old style mounts on the seatbelt towers, the new style mounts just forward of them, and there is roll hoops style that fits over the factory roll hoops. If you have factory roll hoops, your choice is clear: the only style that will work is the one designed to fit over the roll hoops. Otherwise, you have to decide for yourself based on the advantages and disadvantages of the other two. The old style blocks more wind, but installs on the seatbelt towers (meaning an aftermarket rollbar can not be installed) and can not be folded down when the top is up, which may block your rear visibility at night. The new style blocks less wind (but is still effective) and can be folded down when the top is up, improving night visibility. The old style windscreen is relatively easy to install--you can probably do it yourself. The new style windscreen is harder to install--your dealer will probably charge you 2.5 hours labor. I've seen pictures of the new windscreen, and it looks like it blocks the top storage compartment. How can I access it?
I have the old windscreen and noticed it tilts forward a bit. I wondering if this should be corrected so that it is vertical or is the forward tilt the way it is when ya'll installed it. I would think the angle could affect the amount of wind blowing.
How do I raise the roof while I'm sitting in the car?
The Fossett Maneuver: After a week, I figured out that if you don't fold the roof locking handles in when you put the top down, you can reach over your shoulder with your left arm and hook your index finger on the chrome hook of the locking handles. At that point just pull. It's still a bit of effort, but the motion is in a straight line and much better than the right handed center pull. or The Elephant Trunk: I can't claim ownership to the name (from what I remember, one of the kids of a 'board member' gave the process that hame) but if you reach back with your right arm and grab the roof handle and then with your left hand, grab your right wrist you can raise the roof while sitting in the car. The name is a result of the kid telling his dad (I don't think it was a mom) that he looks like an elephant raising his trunk over his head and then swinging it down. Anyway, I've tried it and it works! If you have the flannel window cover on the window, you can then unclip it from the roof frame and pull in into the car. My seat makes these funny clicking noises sometimes. What can I do?
I can hear some sort of clicking noise from the outside of the car. What could it be?
My speedometer reads 3 or 4 MPH higher than the on-board computer. What is wrong?
I have a rattle from the drivers -A- pillar, only noticeable at low speeds. Any ideas on what it might be or potential cures?
Open your hood and find two round rubber bumper things that are screwed into the hood and are located near the corners by the A-Frame. Once you have found a stretch of road that you can easily duplicate the problem go back and "temporarily" unscrew both of these rubber bumper things. Now go back to that same stretch of road and see if the problem was fixed. If the problem didn't go away then reinstall those rubber bumpers and go to your dealer. Tell him you have already checked this and let him figure out what it is. If the A-Frame rattle went away (like mine did) here's the reason why. BMW changed the rubber compound and your rubber bumpers are slightly harder than the new rubber bumpers. The bulletin says to inspect the rumber bumpers and (using a razor blade or pocket knife) trim off the 2mm ring that is standing off the bottom of the bumper. Don't trim the rounded side (This will make since when you see it). Then re-install the rubber bumpers. Any ideas on removing the ugly airbag warning stickers on the visors?
The material on the visors swells up grossly from the solvent. Goes back to normal later. Permanent effects unknown. One person reported a slight discoloration which was easily covered up with shoe polish--looked better than the sticker anyway! It is easier (and probably safer--you don't want to spill lacquer thinner on your seats) if you remove the visors first. and, another response:
How can I get my build date?
Problem: Subwoofer sounds horrible.
After taking apart a lot more than I need to, I found the problem. There is an acoustic tube, located right behind the grille, between the seats, that runs from the subwoofer box and directs the sound down towards the floor. (The grille comes off if you pull it from the bottom and you can see the tube behind it.) Anyway, the tube was not well designed or connected to the woofer box and was the cause of the vibration. I *removed the tube and added it to my collection of original parts. The difference is like night and day! * After looking it over and playing with it a little, I didn't think it was worth the trouble to try to reglue or seal it back into place. I also found that a couple of small tupperware containers fit into the spaces on each side of the subwoofer box. I'm using them to store seldom-used items that will not rattle - a bottle of sunscreen and my backup DC adapter for the battery powered radar detector. [Ed. Note: These spaces are only available if you have the HK upgrade and no roll hoops. The non-HK subwoofer takes up the entire space.] How do I remove the stock manual shifter knob from a Z3?
 How do I replace the rear window on my Z3?
To my satisfaction, it was an installation that I could do myself. The kit included the plastic window, safely protected between 2 sheets of cloth and cardboard, a zipper fastener, locking brackets, and a tool for wedging the canvas under the rubber seal. After reading the instructions, I found out that I also needed rubber cement to seal the edges. The first step was to remove the old window. I had to pull the edge of the canvas top out from under the rubber window seal. I then removed the metal bracket at the middle of the lower edge of the window that kept the zipper from unraveling. After the bracket was removed, the zipper could be "pulled" apart. Attaching the new window was a little tricky. I attached the zipper head to the window then attached the window to the canvas. Lining the 2 sides of the zipper just right took several tries. If the zipper is off aligned by one "tooth", the window would look twisted. Cramped working space from the inside of the car and the hot weather (90 degrees in December!) didn't help make the process any easier. I took me almost an hour before I has it aligned to my satisfaction. The next step involved sealing the canvas around the edges with rubber cement and wedging it under the rubber window seal. The whole process took me about about 2 hours. I hope I don't have to do this again! Does anyone know how to remove the coin-holder on the side pocket?
Where can I get additional caddies for the BMW CD Player?
My Z3 is supposed to have 10 speakers, but I can't seem to find them all.
65mm midranges in front doors (2) and rear deck module (2) 140mm woofers in kick panels (2) 160mm x 230mm woofer(s?) in rear deck module/integral NVH cover (2) My pre-98 Z3 doesn't have the storage nets on the passenger-side transmission tunnel. Can they be added?
Storage Net Part Number: 51-47-2-261-407 I found the rubber tie down straps in the trunk right below the latch, What are those for?
The rubber tie-down straps is for a Warning Triangle that is mandatory in Europe. HOWEVER, I have searched in vain for a folding Warning Triange that will fit it's 3¾"×19"×1" space. The one offered in North America by BMW (P/N 82 11 1 466 578) will not, I repeat, will not fit in the BMW Z3 roadster. I ordered one through my dealer and tried to fit it when it arrived. The BMW Warning Triangle measures 4" tall! I tried my best to fit it, but there is no way. I even tried to figure out if the Triangle could be trimmed to fit. No dice. It will only sit halfway in its cove...and this makes it impossible to have access to your toolbox and battery. Since then, I have tried the local Trak Auto and Pep Boys for a folding triangle, but have so far come up empty-handed. Even the triangle from Mercedes Benz (#Q6590002) doesn't fit. Road flares is a good idea, but I still haven't given up my search yet. I would also like to get the Z3 emblem to possibly add to my M Roadster (which for some reason doesn't have a Z3 logo anywhere on it).

Characters a sold seperately. "Z" part number 51148399-309 Are there any "Easter Eggs" in my Z3?
You will now be treated to a very jolly show indeed. First the DME will display a few of it's internal registers in the mileometer LED space. Next all the gauges on the dash will cycle from zero to full scale deflection and back again whilst all the warning lights illuminate. The registers displayed are 
|
||||||||||||||||||||||||||||||||||||||||||||||||||||||||||||||||||||||||||||||||||||||||||||||||||||||||||||||||||||||||||||||||||||||||||||||||||||||||||||||||||||||||||||||||||||||||||||||||||||||||||||
|


 Z3ers.com~
Esmerelda's Home Page
Z3ers.com~
Esmerelda's Home Page